Gluten-free buttermilk pancakes

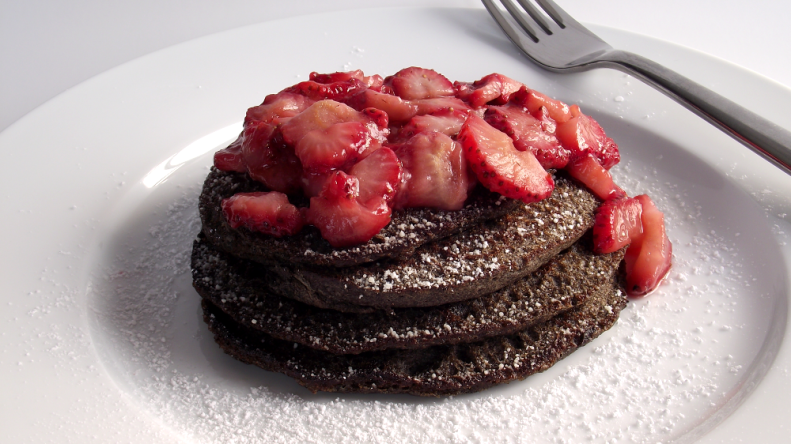
Today is ‘National Pancake Day’.  In honor of such a prestigious day, I whipped up some buckwheat pancakes and warm strawberry compote.

Buckwheat PancakesIngredients: buckwheat flour, potato starch, buttermilk, baking powder, baking soda, salt, brown sugar, vanilla extract, cinnamon, allspice, egg.  Compote: strawberries, honey, water.

Photography Subject : Mango

Organic mango from Ecuador.

If you’ve only had the over-sized, under-ripe supermarket versions of a mango, then you’ve never really had a mango.  The impostors have nothing of the luscious, sweet juiciness of an authentic mango from a small South American farm.

The fruit has a reputation for being a pain to prep, but it really isn’t that difficult.  When readying it to eat, just think outside the box of normal stone fruits, and you’ll do just fine.

Gluten-Free Chocolate Cake : Microwave Mug Cake

How sexy is this?  Check out the moist, yet airy goodness I could only eat half of before giving up and saving the rest for tomorrow:

Yup.  Microwave chocolate cake that’s gluten-free.  It’s possible, it’s awesome, and is crazy-quick to make.  From when I walked into the kitchen with recipe to when I left the kitchen dessert-in-hand: five minutes.  No joke.

Shout-out to ATX Gluten-Free for the base recipe.

GLUTEN-FREE CHOCOLATE MICROWAVE MUG CAKE
– 4 tablespoons gluten-free cake flour
– 4 tablespoons evaporated cane sugar
– 1/2 teaspoon salt
– 1/2 teaspoon baking powder
– 1 large egg
– 2 tablespoons cocoa powder
– 3 tablespoons almond milk
– 3 tablespoons peanut oil
– 1/2 teaspoon vanilla extract
– 1 tablespoon flaked coconut
– 1 pinch fresh-ground coffee

In a bowl, mix dry ingredients thoroughly.  Add the wet ingredients and stir until fully incorporated.  Pour into a greased large coffee mug and microwave 1:30 to 2:30, depending on microwave strength.  (For reference, my microwave is 500 watts and required a full 2:30 to cook the cake.)

* – My homemade GF cake flour is mixed in batches.  The recipe will provide enough flour for one big batch of johnnycakes, a couple dozen muffins, and one or two of the chocolate microwaved mug cakes.  1 cup rice flour + 1/2 cup tapioca flour + 1/3 cup potato starch + 1/2 cup & 2 tablespoons sweet rice flour

Plate Full of Food = No Room Left in Stomach

Can you believe this clocks in at well under 350 calories?

Warm quinoa salad with chicken and kale chips. (Gluten-free)

I’ve recently discovered something about myself.  When I feel troubled, upset, angsty, or just plain stressed, I have an overwhelming urge to create something.  It soothes my soul, salves any new (or lingering old) wounds, and allows a potentially destructive negative energy to be transformed into something beautiful.   And tasty.  Don’t forget tasty.

Today’s lunch took me all of 15 minutes to whip up, and was mind-boggingly filling.  A warm quinoa salad with roasted poultry and baked kale chips is fun for the mouth and nutritious for the body.

– 2/3 cup quinoa
– 1 cup chicken broth
– 1/3 cup water
– 1 Campiri tomato, roughly chopped
– 1/8 cup onion, roughly sliced
– 1/2 small zucchini, sliced into 1/4″ rounds
– 3 ounces cooked boneless/skinless chicken breast, sliced
– 1 quail egg
– 1 tablespoon olive oil
– Kosher salt and black pepper, to taste
– 1 bunch kale, stems larger than 1/4″ removed and discarded
– Spray oil
– Himalayan pink salt, to taste

Heat toaster oven to broil.  Tear kale leaves into chip-sized pieces.  Put chicken stock and water in a saucepan over high heat.  Roughly chop the tomato, place on lightly oiled aluminum foiled-lined pan, and put under broiler.  If chicken stock/water mixture is boiling, add quinoa; bring back to boil, stir, then reduce heat to simmer.  In large saute pan, heat tablespoon of olive oil over medium-high heat.  Add the zuchinni and onion (on separate sides of pan), stirring and flipping occasionally.  Place kale on foil-lined and greased baking tray; spray lightly with oil and sprinkle with pink salt.  Check tomatoes; if they’ve begun to brown, remove from broiler and set toaster oven to bake at 400F.  Put kale in to bake for 7-10 minutes, or until the edges begin to brown but are not burning.  When kale is halfway done, fry quail egg over low heat in a lightly greased pan.  Add the sliced chicken breast to the saute pan with the zucchini and onion, flipping as needed.  When kale is done, the quinoa should have absorbed all liquid, the onions should be lightly carmelized, the zucchini should be golden brown on both sides, the chicken breast should be perfectly seared, and the tomato chunks can be tossed with the onion if they’ve cooled off to much.  Serve immediately.

Vegetarian-friendly:  Sauteed portabella as substitute for chicken
Hearty dinner version:  Add feta or queso cheese to the quinoa salad and increase meat portion


Technique: Super Crispy Rice Paper Spring Rolls

Last month, I discovered a great alternative to traditional Chinese eggrolls: cha gio, or crispy Vietnamese spring rolls.  Made with rice paper, they’re the perfect gluten-free option, with all of the flavor and nearly all the texture of a proper eggroll.

Notice I said “nearly all the texture”?  There was a slight problem, which I was unable to remedy during four other times making these delectable treats throughout the last seven weeks.  The wrappers would fry up to an ideal crispiness, then as they sat cooling, would turn a bit limp.  The longer they sat, the limper they became- so if you’re chowing down on a platter of them, the first one would have ideal texture, but the last one would be severely lacking in the mouthfeel department.  Sometimes there was an outer veneer leftover of crunchy rice starch that hinted at the previous crispiness, and only the over-cooked ones- which were consistently soggy and greasy on the inside- would retain the outside crunchiness I was craving.  I tried various methods of cooling: on a paper towel, on a wire cooling rack, on a rack in the toaster oven set to warm, and wiped with a paper towel immediately upon removal from the fryer and put on a rack.  Nothing yielded the results I wanted.  Until, of course, last night.

My life is going to be changing a lot this year, which translates to the need for convenience foods.  Since I can’t (and won’t) purchase and consume pre-made meals from the supermarket, research on proper home-cooked food preservation has been my obsession for the last couple of weeks.  Among my inquiries was whether or not it was possible to freeze cha gio.  I happened across a Filipino cooking video that briefly mentioned freezing instructions for lumpia- close enough, right?

The advantage of homemade food is that it lends itself to experimentation: usually inexpensive, plus it only takes a small portion of a whole meal to fiddle with for future reference.  In my case, I’d taken a single partially-fried cha gio roll straight from the fryer, wrapped it in aluminum foil, and stuck in the freezer.  Excluding the frying oil, I calculate each veggie cha gio costs me about $0.17, so the experiment was a cheap one indeed!

Last night, after about two weeks of hanging out in my freezer, I pulled the roll out and stuck it in hot oil.  I was surprised to watch as it began to brown- I mean, really brown up, like a proper eggroll!  After about three minutes of frying and another four minutes of cooling, I dipped the end into a bit of sweet chili sauce and bit into it.

CRRRRRUNCH!

Finally, the elusive texture I thought I’d never enjoy again!  The vegetable mixture filling held up great to the freezing, and all the flavors were just as strong and delicious as freshly-made cha gio.

Synopsis for gluten-free crispy spring rolls:
– FILLING: chopped/shredded cabbage, carrot, scallion (green onion), garlic, egg, sesame oil, GF soy sauce, ground dried coriander, ground pepper.  Optional: rice vermicelli (broken into 1-inch segments and soaked in hot water for 10 minutes), mushrooms, cooked meat (poultry, pork), etc .
– OIL: peanut oil is best, but any type of oil can be used.  These fry best between 350-365F; if the oil temp falls below 350F, they will absorb too much oil and become greasy on the inside.
– COOKING: they can be pan-fried, but it’s best to deep-fry them if possible.  Deep-frying can be done on the stove in a stainless or enamel-coated pan, or in a counter-top deep fryer appliance.  The rolls will stick together if they touch in the early stages of cooking: don’t try to separate them while cooking, wait until they’re done and break them apart.  The rolls will probably float as they’re frying; if they do, be sure to flip them over a few times to ensure even cooking on both sides.
– CRISPINESS: to achieve the crispiest shell possible, only partially cook the rolls (about 3 minutes, or until they just begin to take on color).  Transfer to aluminum foil and wrap each one individually.  Freeze for at least 24 hours.  When ready to eat, just remove from foil and fry (about 3 minutes).

Maori Boil-Up

What’s a Maori?  And what are they boiling up?

The Maori are the indigenous people of New Zealand.  They’re the original Polynesian explorers, and got where they are today by courageously paddling canoes around the Pacific a few hundred years ago.  Their word for food is “kai”- and I must say, they eat well: kind salmon, fiddleheads, pumpkin, and shorebirds are just a few components of their traditional diet.  Today I made a very simple rendition of Kai Kohua, otherwise known as a boil-up.  It doesn’t exactly translate to an American or European dish; not quite a soup, not quite a stew.  On the most basic level, it’s a sweet-and-spicy boiled dish with dumplings.  A perfect meal for winter days like today!

The gluten-free dumplings held up much better than I anticipated- not slimy or gritty at all like many rice-based boiled items- all while having a great al-dente firmness.  Although the recipe sounds slightly time consuming, it’s quite easy if you prepare it when you’re home all day and get the relatively small mise en place set up when you begin.  Then just set the egg timer for when the next ingredient needs to be thrown in (carefully thrown in, now- splash burns hurt!).

Here’s what went into this single serving, perfect for lunch:
– 1 pork bone (from small roast, already cooked)
– 3 cups water (enough to cover bone)
– 1 teaspoon salt
– 1/2 bunch fresh watercress, rinsed
– 1 small sweet potato, peeled and chopped

For the gluten-free dumplings*:
– 2/3 cup cake flour (use 2/3 c of base mix: 1 cup rice flour, 1/2 cup tapioca flour, 1/3 cup potato starch, 1/2 cup sweet rice flour)
– 3/4 teaspoon baking powder
– Cold water (about 1/3 cup)
– Salt and pepper, to taste

For regular dumplings, simply use 2/3 cup self-rising flour or baking mix, plus the water and seasoning.

Simmer the pork bone in a covered medium saucepan for one hour.  Remove bone and simmer uncovered to reduce stock to about two cups.  This can be made the day before the rest of the boil-up is prepared, which is recommended because the fat from the stock can solidify and be skimmed after setting.

Bring the stock to a simmer and add the watercress, cover and cook for 15 minutes.  Add the sweet potato, cover, and cook for 10 minutes

Meanwhile, combine the dumpling dry ingredients.  Using your hands, drizzle in 1/2 of the water while mixing the dumpling dough with your fingers.  Slowly drizzle in the rest of the water until a slightly sticky dough is formed.  Let sit for 1-2 minutes.

To make the dumplings, either use a spoon to scoop the dough into small equal portions, or use your fingers to pull off small balls.  Add the dumplings to the simmering mixture, pushing them down if they try to float.  Cook uncovered for 10-15 minutes (depending on size) until done.

(* I didn’t create the flour blend recipe, but for the life of me I can’t find where I discovered it!  It’s a gluten-free cake flour blend I used in a fabulous cornbread recipe for Christmas supper; if I had to guess, I believe the credit goes to either ‘Gluten Free Girl and Chef’ or ‘Gluten Free on a Shoestring’.  The recipe makes a wonderfully light, yet sturdy blend that I highly recommend keeping on hand like I do for those moments of “I wanna bake something, but don’t wanna deal with measuring and weighing all the bajillions of flours I need for the right blend!”)

Repurposing Leftovers with an International Twist

So, let’s say you’re a ridiculously ambitious cook who had recently cooked a large meal based exclusively on a single country’s cuisine.  And you have leftovers spilling from your fridge.  And, if the leftovers were all Mexican, the last thing you want to put in your mouth is more Mexican food, no matter how tasty it is.

Today’s impromptu cooking project started with a simple snack:

This is what I came up with after five minutes of raiding the pantry, surveying the fridge, microwaving, stirring, chopping, and rinsing.  Meet Punjabi papad masala.  Try saying that three times fast!  On second thought, maybe not- I don’t want anyone to hurt themself.  The bottom layer is Punjabi papadum crisps, purchased raw from the ethnic grocer, then lightly sprayed with oil and microwaved until crispy.  The greens are watercress, stemmed and thoroughly rinsed.  Campiri tomatoes were roughly chopped.  The sauce/dressing is some leftover Greek yogurt into which I stirred some honey and fresh-squeezed Meyer lemon juice (can you tell the produce situation in Alaska is improving greatly?).

After crunchy-munching away, with eyes watering slightly from the hefty kick of the Punjabi spice and the watercress’ inherent pepperiness, I returned to the kitchen and dejectedly gazed at the leftover yogurt-honey-lemon mixture.

Something tingled deep in my head.

I opened the fridge to once again inventory the selection of ageing Mexican goodies.  The tingle grew to a vibration.  I glanced from the adobo-marinated roast pork, to the salsa, to the rice pilaf, then sneaked a peek back to the yogurt mixture.  The ingredients listing for everything did some sort of voodoo in my brain, then the figurative light bulb came on.

What other cuisine shares the same ingredients as the rice pilaf?  Cilantro, onion, celery?  Chinese!

And what about the salsa: tomato, onion, garlic, chiles, cilantro?  I’ll take Indian for $1,000, Alec.

So the rice pilaf was sauteed up with some of the pork (chopped), frozen mixed veggies, ground dried coriander, Chinese 5-spice, fried egg, and soy sauce to make this delicacy:


Fried rice, yay!

So what if I took the Mexican salsa from the other night (pictured here simmering in the pan):

Threw it in the food processor, added the remaining leftover yogurt sauce, sprinkled in some cumin, garam masala, curry powder, dumped in some more of the leftover chopped pork, and stirred in a healthy splash of cream.  Pork tikka masala!

Ah, but why stop there?  Bet ya can’t guess what this is, even though all of the ingredients are either pictured or the soon-to-be-added components have already been mentioned in this post:

Not sure?  I don’t blame ya, so here’s another hint: it’s an obscure dish common among the Maori people of New Zealand.  Still scratching your head?  No worries.  The above photo is the beginning phase of making a proper Maori boil-up (pork bone, watercress, sweet potato, dumplings).  Embarassingly, I didn’t realize the pork roast was bone-in, but was tickled pink when I was carving it up for the other repurposing efforts and discovered a huge honking slab of bone, with all kinds of meaty bits still attached.  Into a small pot of water it went; it simmered and boiled, covered, for a half hour before I lifted the lid and allowed it to reduce by half, then turned off the heat.  Tomorrow’s boil-up lunch should be terrific!

Who knew that international cuisine could be so easily converted to trademark dishes from other countries!  Next month’s themed dinner is Italian, but I can’t fathom how I’m going to give those leftovers a globetrotting makeover.
Four-Course Mexican Dinner

The format has officially changed.  2012 is over, so my “Food Photo Per Day” project is no longer the priority.  My current intention is for this to be a sort of catch-all blog for my meals, photos, and ramblings that aren’t quite worthy of the new [monetized] food blog I’ll be launching in the next couple of months.  Think of it as a personal food diary maintained by yours truly.

I started a new thing last month.  In an effort to expand my culinary horizons in anticipation of next year’s book project, I’ve taken on the inadvertent goal of producing a multi-course themed meal once per month.  My life-partner-in-crime (The Patrick) selects the country, and I go about making meals with authentic ingredients and techniques.  Last month’s themed supper was a barrage of French dishes, and was such an enjoyable experience, I’ve committed wholeheartedly to this new tradition.

Today I tackled Mexican cuisine.  Not Tex-Mex, not the monstrosities served at Taco Bell.  Authentic food from the United Mexican States.  It was fabulous, albeit very filling; we only ended up eating half of each portion.  On the bright side, we have some awesome leftovers to look forward to.

Nearly everything was made from scratch, although I did “cheat” on three counts:
– Used a store-bought corn tortilla for the tostada (although I fried it myself)
– Accompanied the seafood cocktail with store-bought Saltine crackers (the dish has only been around for 60ish years, but it’s already “tradition” to serve with proper Saltines)
– The tropical cocktail, not pictured, was a frozen concoction (Dole orange-peach-mango) with silver/non-spiced rum: AMAZING

Mexican Dinner(Everything pictured is gluten-free.)

Clockwise from top left:

TOSTADA
Fresh-fried corn tortilla, refried beans (red beans soaked overnight, cooked until soft, mashed with cumin/salt/sour cream), Romaine lettuce, pico de gallo (http://recipes.sparkpeople.com/recipe-detail.asp?recipe=297224), skirt steak (http://www.foodnetwork.com/recipes/alton-brown/skirt-steak-recipe/index.html), queso cheese.

SEAFOOD COCKTAIL
Alaska king crab and Gulf of Mexico wild-caught shrimp in sauce (http://www.saveur.com/article/Recipes/Mexican-Seafood-Cocktail), saltine crackers.

PORK, MOLE SAUCE, RICE PILAF
Marinated roast pork (http://www.saveur.com/article/Recipes/Pork-with-Mole-Negro-Sauce), Mole Negro sauce (http://www.foodnetwork.com/recipes/emeril-lagasse/oaxacan-black-mole-mole-negro-recipe/index.html), rice pilaf (http://www.saveur.com/article/Recipes/Mexican-Rice-Pilaf).

CHILE RELLENOS
Anaheim pepper stuffed with shredded Monterey Jack and queso cheeses fried in an airy batter (http://www.chow.com/recipes/29565-chiles-rellenos) with warm salsa (http://vespawoolf.hubpages.com/hub/The-Best-Homemade-Mexican-Salsa-Recipe).

Tostadas

Tostadas

Taco meat (ground moose, masa harina, sugar, salt, black pepper, cayenne pepper, garlic powder, onion powder, cumin, oregano, chili powder), spiced beans (red beans, ham hock, onion, bay leaf, hot sauce, garlic, green chiles, lard, chicken stock, salt), fresh-fried corn tortillas, queso fresco, campari tomatoes, Romaine lettuce, onion.